Windows 10 Servicing is an easy way to deploy a new version of Windows 10 to your environment, but sometimes you want to have more control. In this post, I will explain how you can do that.
Device Collections
We need two Device Collections. The first one contains the systems that are ready to update. The second one will be populated by a Task Sequence (more information later in this post).

Packages
Ensure that all source files are already downloaded on the system when the end user starts the update. A Package can be pre-cached on the system to run directly without waiting for the MEMCM client to download the content first (which reduces waiting times for the end user).

PSAppDeployToolkit
The actual Windows 10 Feature Update will be done using the PSAppDeployToolkit. This framework has a lot of features, including user interaction. This will be the source for the Windows 10 Feature Update Package created in the previous step.
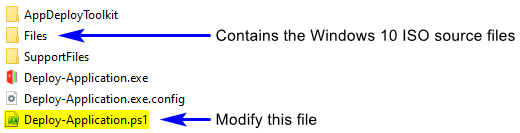
The modified Deploy-Application.ps1 file that I use can be found on my GitHub page. More information about the commands can be found in the Scripts section.
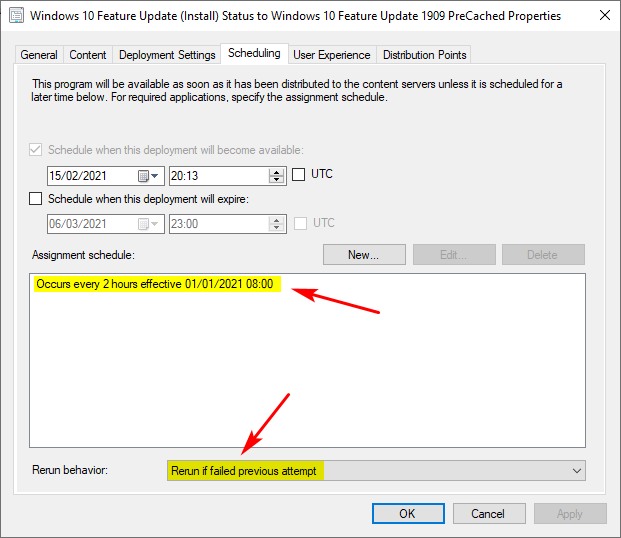
Create a Program and deploy it to the Windows 10 Feature Update 1909 PreCached Device Collection. Do not forget to enable “Allow users to interact with this program” and make the deployment required.


When the end user defers the update, the deployment should rerun after a while. To make this happen, we need to create a custom schedule. Make sure to select the correct rerun behavior. When the installation gets deferred, it will return an error code, and MEMCM will rerun every 2 hours.
Task Sequences
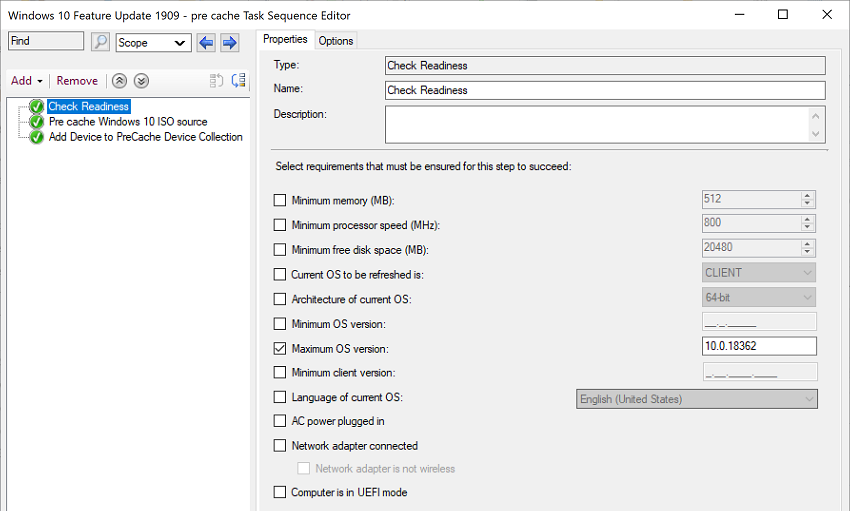
The Task Sequence is used to pre-cache all the source files needed to run the update.

In my example, the “Check Readiness” step will check if the current OS version is lower than the update (10.0.18363) that we will install. If not, it has no use to pre-cache the source files and waste any disk space.
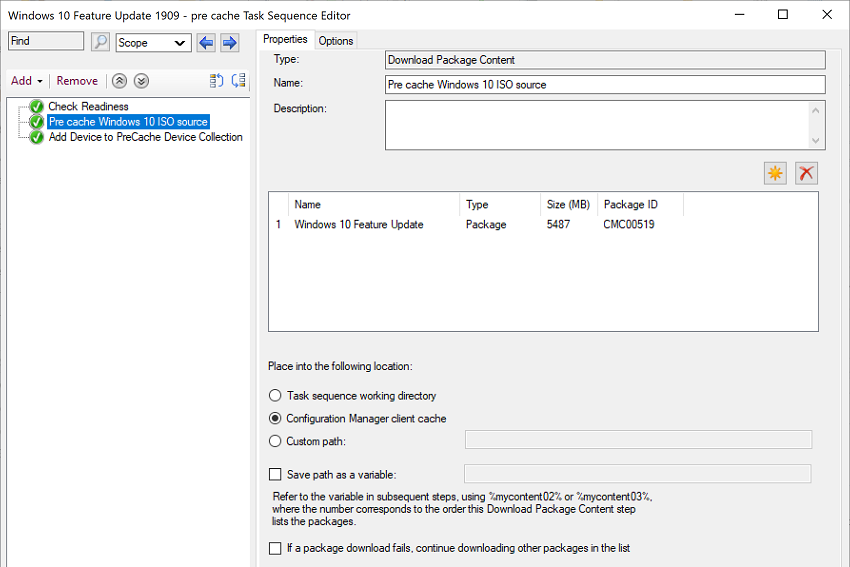
Download (pre-cache) the source files to the ccmcache folder on the system.
Now comes the tricky part. How does MEMCM know when the Package is pre-cached and can be started? Launching the Package in the Task Sequence is impossible because it requires user interaction after the pre-cache step.
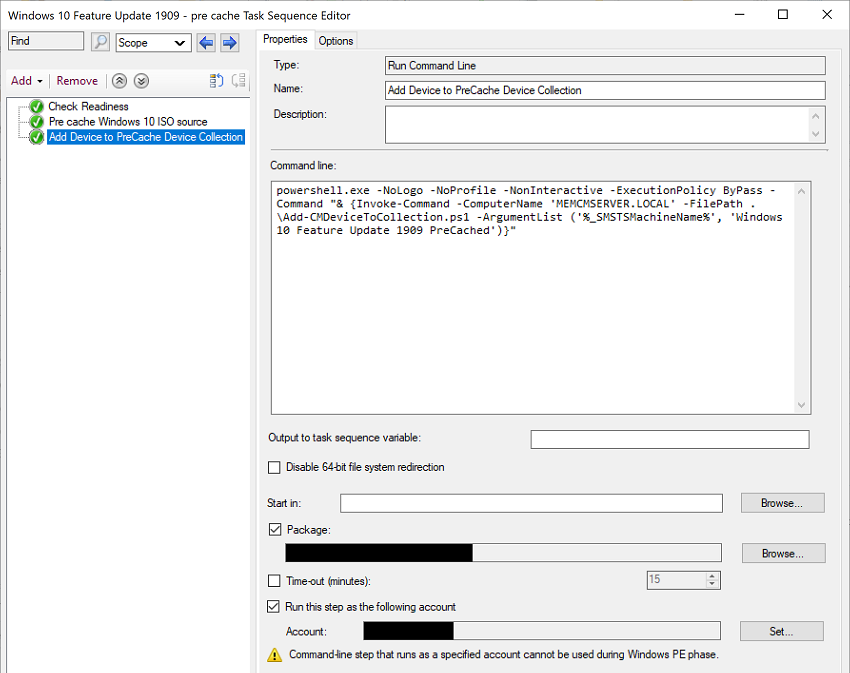
I created a PowerShell script to add the system to a Device Collection that will deploy the Package to the system. The Add-CMDeviceToCollection.ps1 file that I use can be found on my GitHub page. More information about the commands can be found in the Scripts section.
The command line below will execute the Add-CMDeviceToCollection.ps1 script on the MEMCM Site Server. Make sure you create a Package containing this script to refer to it in the command line. Also, provide an account with permissions on the MEMCM Site Server itself (because we invoke the command on the server) to add a Device to a Device Collection.
Change the value of the parameter -ComputerName to your MEMCM Site Server.
Deploy this Task Sequence as required to the Device Collection Windows 10 Feature Update 1909.

Result
After the system has been added to the Device Collection Windows 10 Feature Update 1909, MEMCM will download the PSAppDeployToolkit locally. When the content is downloaded, the Task Sequence will add the system to the Device Collection Windows 10 Feature Update 1909 PreCached, and the end user will be prompted with the following message:
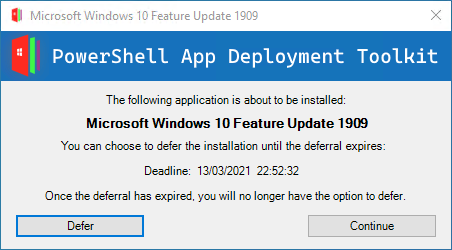
The Windows 10 Feature Update can now start.
Scripts
You can find the scripts used in this post on my GitHub page.
Deploy-Application.ps1
The if statement will prevent the update from running twice. This is just a safety measure.
The else statement will prevent the Balloon notification from appearing, so the end user does not receive any notifications:
If ([System.Environment]::OSVersion.Version.Build -lt 18363) {
	...
}
Else {
	[boolean]$configShowBalloonNotifications = $false
}Code language: PowerShell (powershell)
Make sure the system has enough free disk space (15GB in this example) and allow the user to defer the update during the next seven days:
Show-InstallationWelcome -CheckDiskSpace -RequiredDiskSpace 15360 -AllowDefer -DeferDays 7 -PersistPromptCode language: PowerShell (powershell)Inform the end user about the update:
Show-InstallationPrompt -Message 'The Windows 10 Feature Update has started. Please make sure your system is connected to the power at all times. This installation is fully automated, so do not touch your system during the update.' -ButtonRightText 'Accept' -Icon Warning -NoWaitCode language: PowerShell (powershell)Create a folder with the computer name on a network share to capture the logs:
If (Test-Path -Path "\\share\W10FeatureUpgrades\$($envComputerName)") {
	Remove-Item -Path "\\share\W10FeatureUpgrades\$($envComputerName)" -Recurse
}
New-Item -Path "\\share\W10FeatureUpgrades\$($envComputerName)" -ItemType DirectoryCode language: PowerShell (powershell)
Start the update, suspend BitLocker, copy the logs to the network share, and not reboot automatically.
Using the /DynamicUpdate parameter with enable can result in an error when the system cannot download the updates. When you use a firewall with user authentication, and MEMCM uses the SYSTEM account, this can happen.
Execute-Process -Path "setup.exe" -Parameters "/auto upgrade /migratedrivers all /bitlocker alwayssuspend /copylogs \\share\W10FeatureUpgrades\$($envComputerName) /noreboot"Code language: PowerShell (powershell)Prompt the end user to reboot the system to complete the update:
Show-InstallationPrompt -Message 'To complete the Windows 10 Feature Update, please reboot your system.' -ButtonRightText 'Agree' -Icon Warning -NoWaitCode language: PowerShell (powershell)For some reason, Show-InstallationRestartPrompt does not work to reboot the system. Therefore, I use the old-fashioned way:
Execute-Process -Path "shutdown.exe" -Parameters "/r /t 600"Code language: PowerShell (powershell)Add-CMDeviceToCollection.ps1
Change the value of these variables to the ones of your infrastructure:
$MEMCMSiteCodeName	= "S01"
$MEMCMSiteServerName	= "MEMCMSERVER.LOCAL"Code language: PowerShell (powershell)